Easter Egg Coloring the Natural Way – Plus a Recipe for Eating Your Eggs
Thinking back to when you were a kid, did you dye Easter eggs? I remember it as one of my favorite Springtime pastimes.
Dyeing eggs in Spring is a tradition going back thousands of years. Eggs are a symbol of new life, rebirth, fertility and wholeness. And it’s fun for kids and kids at heart.
I’m filing this post in “Food as Medicine,” as sometimes the best “medicine” is simply having fun. I had fun dying eggs using one of my favorite spices as a natural dye, as you’ll see in the video.
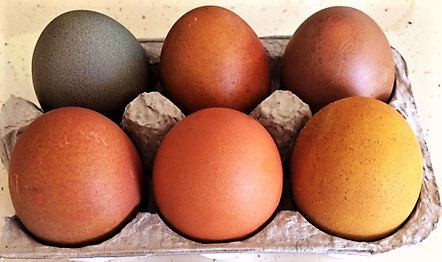
My assistant Rebecca took our Easter egg coloring experiment even further. After the video you can see the lovely colors she created using various foods as all-natural non-toxic dyes.
Plus, as your naturally dyed eggs are safe for eating, I’ve included a recipe for Sunshine Stuffed Eggs at the end — a delicious and healthy lemony/turmeric variation on deviled eggs!
Easter Egg Coloring: Synthetic Dyes vs. The Natural Way

How do most people dye eggs? If you’re anything like me, growing up you probably bought the kits. They came packed with bright colored tablets, and every tool you’d need, often even including designs to help you customize your eggs.
The steps were simple, get some eggs, drop the tablets in cold water and then dip the eggs in the water. Bam, bright neon colored eggs in seconds.
But what about what’s actually in those kits?
While these kits are for the most part safe, they’re filled with synthetic dyes. And just like most people would rather use natural dyes for everything from their food to their hair dye, Easter eggs shouldn’t be an exception.
So how do you dye eggs without these kits, and does it actually work as well as the traditional kits?
I think so …
Making the Natural Dye for Golden Turmeric Eggs
Gently boil together 2 tablespoons of turmeric powder with one tablespoon of vinegar and one cup of water.
For the deep red variation, omit the vinegar and add one tablespoon of baking soda.
What Else Can You Use as Natural Egg Dye?
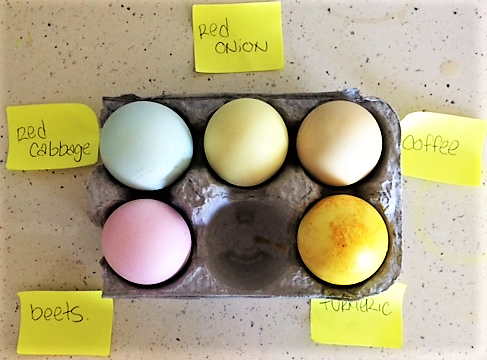
Dyeing eggs naturally is a lot simpler than one might think. Ingredients such as turmeric, coffee, onions, and cabbage are all examples of foods that will work to dye eggs a great variety of colors.
Here are some foods that will easily dye eggs:
- Coffee: Brown on either color of eggs
- Spinach: White or brown eggs while producing a green color but the color of the egg will determine the shade of green made.
- Raspberries: White eggs create bright pink color and brown eggs create a burgundy.
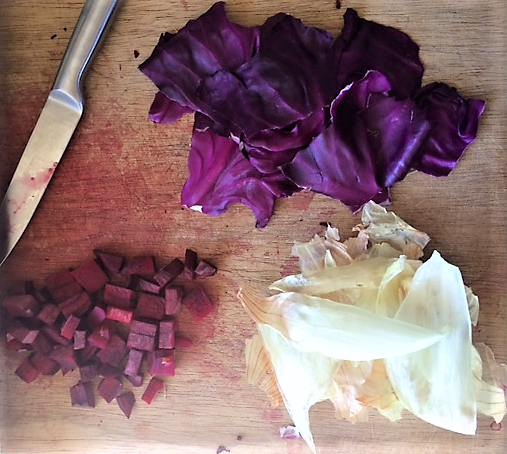
- Beets: On white eggs, it will be a bright pink on brown eggs it’s a dark maroon.
- Red Cabbage: On white eggs, the color resembles a light blue and on brown eggs, it can be dark blue, sometimes with a tint of brown.
- Red Onion: On white eggs the color is a bright yellow and brown eggs create a dark orange.
- Yellow/White Onion: For those who want a type of design wrapping white eggs in onion skin works. Unfortunately, this doesn’t work as well on brown eggs or with colors besides the yellow from the onion skin.
Now while you may not be able to get a leopard print neon egg, you can still easily obtain rich deep colors that are arguably just as, if not more, beautiful. There are also different methods to get marbled patterns which are not much more complex than the kit version.
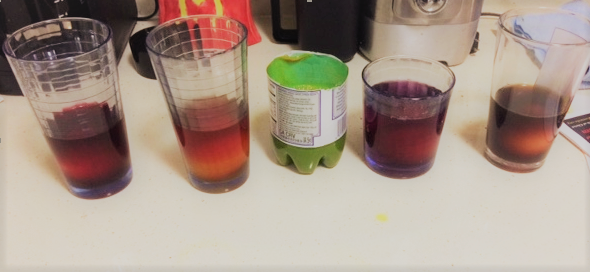
Looking at various articles[i] [ii][iii][iv], when it comes to the water to food ratio, the best rule I found is that the more food you put in the deeper the color, the less food used the softer the color would be.
Though some recipes called for large quantities of food ingredients, I found that you could easily eyeball it as the foods were soaking and add more as needed.
Steps/Ingredients for Natural Easter Egg Coloring:
What you will need:
- Water
- Eggs (white or brown)
- Vinegar (distilled white vinegar is best)
- Foods to use as dye
- Bowls or containers
If following the patterned eggs steps, additionally you’ll need:
- Paper towels
- Rubber bands or twine
- A weight to keep eggs submerged
Step One
For perfect boiled eggs, place eggs in pan. Submerge in cold water. Slowly bring to a boil on medium heat. When they start to boil, cover the pan with a lid, turn the heat off and let them sit for at least 10 minutes.
Step Two
Prepare the the different foods by chopping up the root vegetables, measuring out spices, or separating leaves. I found that bigger is better for things like onion, cabbage, and spinach. Try to keep the leaves and skin as large as possible. For foods such as beets and raspberry, the size did not matter so much as the ratio to water.
Step Three
Place your chosen dye ingredient in the boiling water with the vinegar at a ratio of one tablespoon of vinegar per cup of water. Let this boil for 10-15 minutes
Step Four
Use a spoon to scoop out some of the liquid to test the color. After the water takes on the desired color, remove the water from the heat. Pour your dye in a container deep enough for the eggs to be completely submerged and then gently place the eggs in the water.
Step Five
Place the eggs in the dye. For white eggs, you can leave them in briefly for pastel colors. For brighter colors, let them sit in the dye overnight. For the best results with brown eggs, leave them in the dye for at least 30 minutes or even better overnight.
Step Six
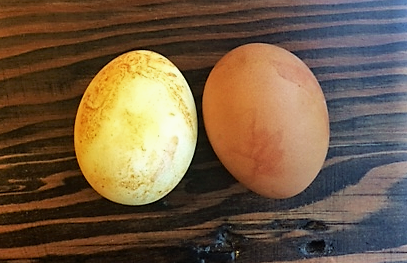
Once the eggs have been dyed, put them back into the egg carton to let them dry. As the eggs fully dry, they will change color — sometimes dramatically! For instance, eggs dyed with red cabbage appear brownish when wet and blue when dry .
If plain colors aren’t your style and you want a little more flare, fear not. As mentioned before, dyeing eggs naturally doesn’t completely take away the possibility of getting patterned eggs.
Steps for Patterned Eggs
If you want marbled patterns, this is a simple variation on Easter egg coloring!
Step One
Get a pot and fill it with enough water to submerge the eggs completely. Set to high and boil. While you wait for the water to boil, peel as many red, yellow or white onions as you need. You won’t need the actual onion, just the skins.
Step Two
Wet as many uncooked eggs you are going to use with cold water and wrap the eggs in onion skin. Red or yellow/white is fine. The trick here is that you want to cover the entire egg, making it as busy as possible. The more skins you have on the egg the more noticeable a design!
Keep in mind that if onions aren’t your cup of tea, try leaves and/or flowers. Both create a less busy pattern while still adding a pop of something besides just color.
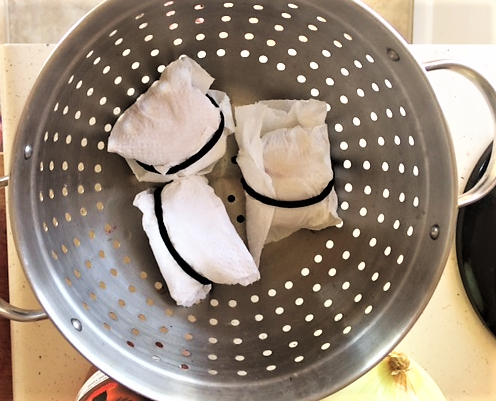
Wrapped Eggs
Step Three
Once the eggs are wrapped in skin or whatever you’d like, wrap them in a paper towel. Try to make this as tight as possible without ripping. The towel acts a sealant to lock in all the designs and color. Secure with rubber bands or twine to keep the towel from unfolding.
Step Four
Place each egg in your pot with the boiling water and add vinegar. Remember, one tablespoon vinegar per cup of water. This is going to need to sit on medium high heat for about 20-30 minutes. If the eggs are already cooked, reduce the heat to medium.
Step Five
Patterned Eggs
Next, you’re going to need a weight to keep the eggs from floating. This can be a lid that is smaller than the pot being used, a metal strainer, etc.; just anything that will hold the eggs down without cracking them or melting.
Step Six
Once the 30 minute mark has passed, take the eggs out and let them cool on a plate or strainer until the towel is cool enough to handle. This takes about 10-15 minutes. After this, unwrap the egg, removing all skins and petals, then let it dry the same way as if the eggs had just been colored.
The Finished Product: Enjoy Making Them and Eating Them!
A final note on patterned eggs. Using the dye water described in the first recipe in exchange for regular water will not color the eggs. My guess is that the colors aren’t strong enough to get through the thickness of the towel. However, using a lighter material for a towel, such as cheesecloth, or letting the eggs sit for a longer period in the water may yield a different result.
Similarly, this pattern method really shows the best results on white eggs; brown eggs do show a slight pattern, but not much compared to their white counterparts.
Lastly, like kit dyed eggs, eggs dyed naturally will loose their color if they are left in the sun for too long. However, unlike kit dyed eggs, naturally dyed eggs are completely safe to eat as long as they’ve been hard boiled first (though they may taste slightly like the food they were dyed with).
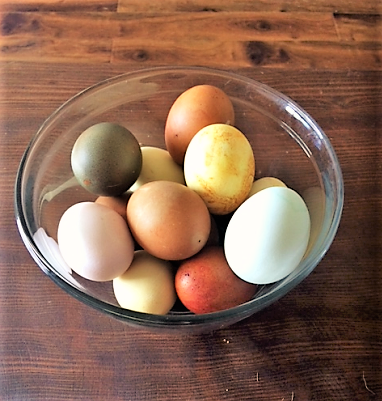
Just look at how gorgeous these eggs are! With natural dyes, you can have fun Easter egg coloring AND feel good about eating them.
So next up is a recipe for Sunshine Stuffed Eggs using the bright flavors and colors of lemon and turmeric.
Why Eat Eggs (Especially the Yolk?)
The following recipe for Sunshine Stuffed Eggs includes the yolks, as contrary to some common thinking, the yolk is the healthiest part of an egg.
Throwing out the yolk and just eating mostly egg whites may makes sense if you’re trying to limit fat intake, or reduce calories, but do NOT be afraid of eating egg yolks from organic free-range eggs.
They’re the most nutrient dense, antioxidant-rich, vitamin and mineral loaded portion of the egg.
Yolks contain B-vitamins, trace minerals, folate, choline, lutein, EVERY one of the fat soluble vitamins A, D, E, and K…. as well as ALL of the essential fatty acids (EFAs).
And if you’re concerned about the cholesterol, don’t be.
It has recently been PROVEN that the cholesterol in the diet doesn’t really raise the cholesterol in blood. In fact, whole eggs have been shown through university research to raise the GOOD cholesterol and therefore, they are NOT associated with increased risk of heart disease.
Adding turmeric and lemon juice add nutritional goodness to your eggs.
So enjoy a time-honored tradition of coloring and eating eggs this Easter!
Sunshine Stuffed Eggs
The bright colors and flavors of lemon and turmeric add a sunny twist to deviled eggs!
Makes 24 egg halves
- 12 hard cooked eggs, peeled
- 4 tablespoons mayonnaise
- 2 teaspoons olive oil
- 1 tablespoon Dijon mustard
- Zest of 1 lemon
- Juice of 1 lemon
- 1 teaspoon turmeric powder
- 2 tablespoons chopped green scallion
- 1 tablespoon finely chopped Kalamata olives
Garnishes:
- slices of Kalamata olives
- Italian flat-leaf parsley
Directions:
- Zest and juice the lemon.
- Slice the cooked eggs in half, lay whites on a plate and put yolks in a large mixing bowl.
- Break the yolks up with a fork. Add mayo, mustard, olive oil, turmeric, lemon zest and juice. Mix well to combine in a smooth consistency. Stir in scallions and olives.
- Stuff the whites with the filling mixture.
- Garnish each filled half-egg with olive slices and leaves of parsley. Refrigerate until ready to serve.
Serving suggestions: Place eggs in a nest of parsley, or nestled on a platter rimmed with sprigs of fresh rosemary or basil.
Footnotes:
[i] http://www.seriouseats.com/2010/04/how-to-dye-easter-eggs-naturally-without-a-box-onion-skins-beets-cabbage.html
[ii] http://www.thekitchn.com/how-to-make-onionskin-easter-e-81574
[iii] http://www.seriouseats.com/2010/04/how-to-dye-easter-eggs-naturally-without-a-box-onion-skins-beets-cabbage.html
[iv] http://www.pbs.org/parents/kitchenexplorers/2014/04/03/how-to-dye-easter-eggs-naturally/